46

APPEMMK A • BEADED AMULET PURSES
Tubular Peyote Stitch —
Even Count
Used in Projects One, Four and Sewen
Historically, tubular peyote stitch is woven with an odd number of beads in the base row which results in a con-tinuous spiral bead path. However, the purses in this book use an even number of beads in the base strand. This even-count tubular peyote stitch results in a straight top and bottom after flattening the tubę. The bottom can then be stitched closed to create the body of the purse. The even-count stitch also allows for a centered, symmetrical design in the finished beadwork. A centered design such as Project One or circular, symmetrical geometrie design such as Project Four will always be an even-count pattern.
To make a sample. String 30 large seed beads. Si?e 10c works well for this sample. Alternate between dark and light beads in this base strand. Tie the beads into a drcle. Between the knot and the last bead allow a space equiv-alent to one or two beads (figurę A-10). Otherwise the tension of the first three rows will be too tight. This space will bc uiken up when you do the third row. Place the
circle of beads over a support. See Lightweight Supports for Beading, page 7.
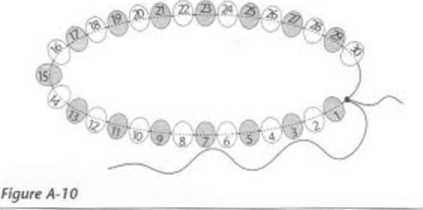
Notę: If the graphed design immediately begins with a bead pattern in the first fwo rows, you will need to check for a correct or incorrect placement of the circle of beods on the support. Place the circle so the first beads to the left of the knot are the first beads, at the bottom right on the graph numbers 1,2,3, etc. If not, either take the circle of beads off the support and (lip the circle or slide the circle down to the other end of the support.
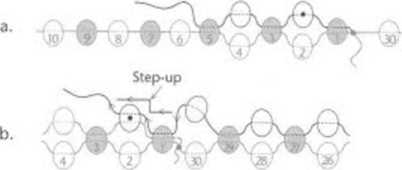
To begin row three. Working from right to left, take the needle through the first bead to the left of the knot. Pick up a light bead and put the needle through bead three of the base strand. Pick up another light bead and pass through bead five (figurę A-11 a). Continue beading the circle until you meet bead one.
Pick up the last bead of row three and pass back through bead one (figurę A-l 1b). Thread again through the first bead of row three, the dotted bead.
Notę: The dotted bead indicates the first bead of eoch row in even-count tubular peyote stitch. For further informa-tion, see "How to read tubular peyote stitch grophs" on page 57.
You have just done a step-up. Rows one, two and three are now complete and the top of the work is straight. A step-up joins the beginning and end of a row and is now required at the end of each subsequent row. Pick up the next dotted bead to begin row four. Continue beading the rows of even-count tubular peyote stitch until you've mastered them. From time-to-time slide the woven beads down the tubę.
Work Tip: The tension of the first three rows may slill not equal the tension of the latter rows. This is not unusual. It 's not always easy to gauge how long a thread space to leawe between the knot and the circle of beads in the base strand. If the tension is uneven, undo the first three rows and reweave them after the beoded tubę is complete. Or bead the first three rows in a different color and then begin the First ro>v of the graphed pattern after the surrogate three rows. Undo these three rows after the tubę is completed.
Figurę A-l 1 a & b
Wyszukiwarka
Podobne podstrony:
*4 AFPtNDtt A • BEADED AMULET PURSESFiat Peyote Stltch — Even-Count Decreasing at the sides Continui
*4 AFPtNDtt A • BEADED AMULET PURSESFiat Peyote Stltch — Even-Count Decreasing at the sides Continui
8EAOED AMULET PURSE5 • APPENDIX A 47Tubular Lattice Netting Used in Project Three Tubular lattice ne
BEADED AMULET PURSES • APPENDIX B 57How to read even-count tubular peyote graphs The tubular peyote
W PROJECT SEVEN • BEADED AMULET PURSES Once the back is properly aligned and "zippered" cl
BEADED AMULET PURSES • PROJECT ONE 11 To make the strap. Think oł the strap as a necklace. Choose th
16 PROfECT THREE • BEADED AMULET PURSES 16 PROfECT THREE • BEADED AMULET PURSESProject ThreeRain For
BEADED AMULET PURSES • PROIECT THREE 17 Sections to be read before beginning: • Tu
IS rRO)£CT THREE • BEADED AMULET PURSES To apply edge bcading to the ribbon. After the ribbon is sti
BEADED AMULET PURSES • PROJECT SIX 31 Sections to read before beginning: •
BEADED AMULET PURSES • PROJECT SIX 33 To add the fringes to the edges. Add two-bead fringes between
więcej podobnych podstron