22
22 PROJECT FOUR • BEADED AMULET PURSES
To make the branched fringe. Begin a new thread and exit one of the center beads. Stitch longer branched fringes to the center of the fiat bottom and then gradu-ally smaller fringes as you cluster the fringes along the four reduction seams. Follow the arrows on figurę 2. Do not cover the entire bottom.
String 20 white charlottes. Without returning through the last bead, pass back through four seed beads and exit. String four white charlottes and one pink or green delica, double-back through all but the colored bead and exit. You've just created a branch. We did not put a colored delica on every branch. Continue up the original strand for seven morę beads and exit. Make another branch and finally pass back through the last eight beads of the original 20. Re-enter the anchor bead on the bottom from the opposite side. Otherwise the fringe will flop over (figurę 3).

Carry the thread through a few beads along an axis and create another branched fringe. Continue to bead new fringes, gradually decreasing the number of beads in the original strand and the branches, ending with nine beads in the strand and three beads in the branches. To help keep the thread from snagging, cover the fringes you've already done with your hand.
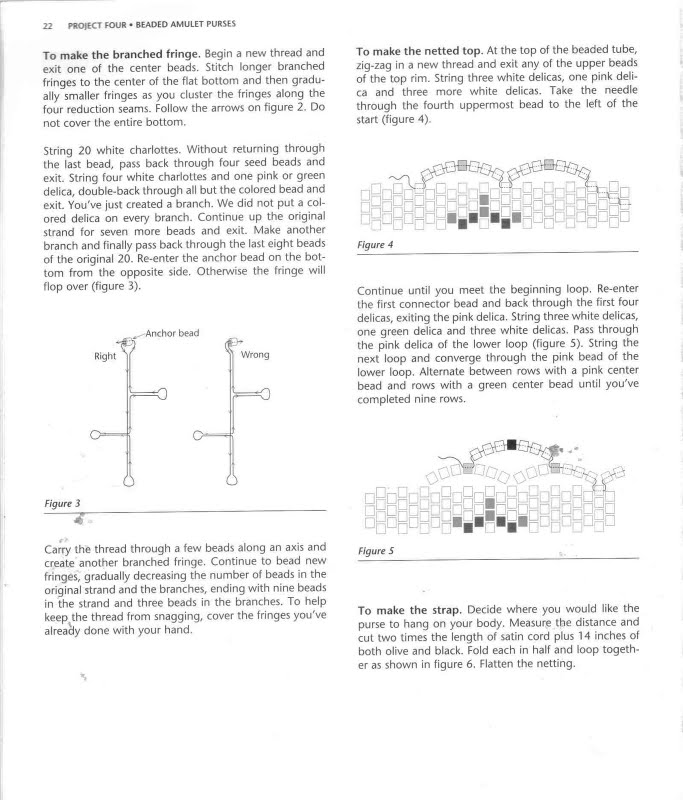
To make the netted top. At the top of the beaded tubę, zig-zag in a new thread and exit any of the upper beads of the top rim. String three white delicas, one pink delica and three morę white delicas. Take the needle through the fourth uppermost bead to the left of the start (figurę 4).

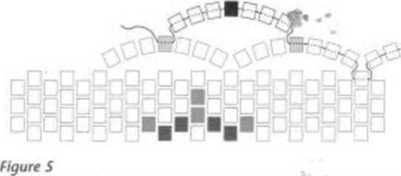
Continue until you meet the beginning loop. Re-enter the first connector bead and back through the first four delicas, exiting the pink delica. String three white delicas, one green delica and three white delicas. Pass through the pink delica of the lower loop (figurę 5). String the next loop and converge through the pink bead of the lower loop. Alternate between rows with a pink center bead and rows with a green center bead until you've completed nine rows.
To make the strap. Decide where you would like the purse to hang on your body. Measure the distance and cut two limes the length of satin cord plus 14 inches of both olive and black. Fold each in half and loop togeth-er as shown in figurę 6. Flatten the netting.
Wyszukiwarka
Podobne podstrony:
14 PROIECT TWO • BEAOEO AMULET PURSES To make the triangular flap. After completing the last row of
IS rRO)£CT THREE • BEADED AMULET PURSES To apply edge bcading to the ribbon. After the ribbon is sti
20 PRO
30 PROJECT SIX • BEADED AMULET PURSES 30 PROJECT SIX • BEADED AMULET PURSESProject SixWinged Bag Dav
W PROJECT SEVEN • BEADED AMULET PURSES Once the back is properly aligned and "zippered" cl
BEADED AMULET PURSES • PROJECT ONE 11 To make the strap. Think oł the strap as a necklace. Choose th
BEADED AMULET PURSES • PROJECT FOUR 21 Sections to bo read before beginning: • Tub
BEADED AMULET PURSES • PROJECT SIX 31 Sections to read before beginning: •
BEADED AMULET PURSES • PROJECT SIX 33 To add the fringes to the edges. Add two-bead fringes between
BEADED AMULET PURSES • PROIECT SEVEN i ) Figurę 4 To make the triangular points at the top of the pu
więcej podobnych podstron