Instr 6
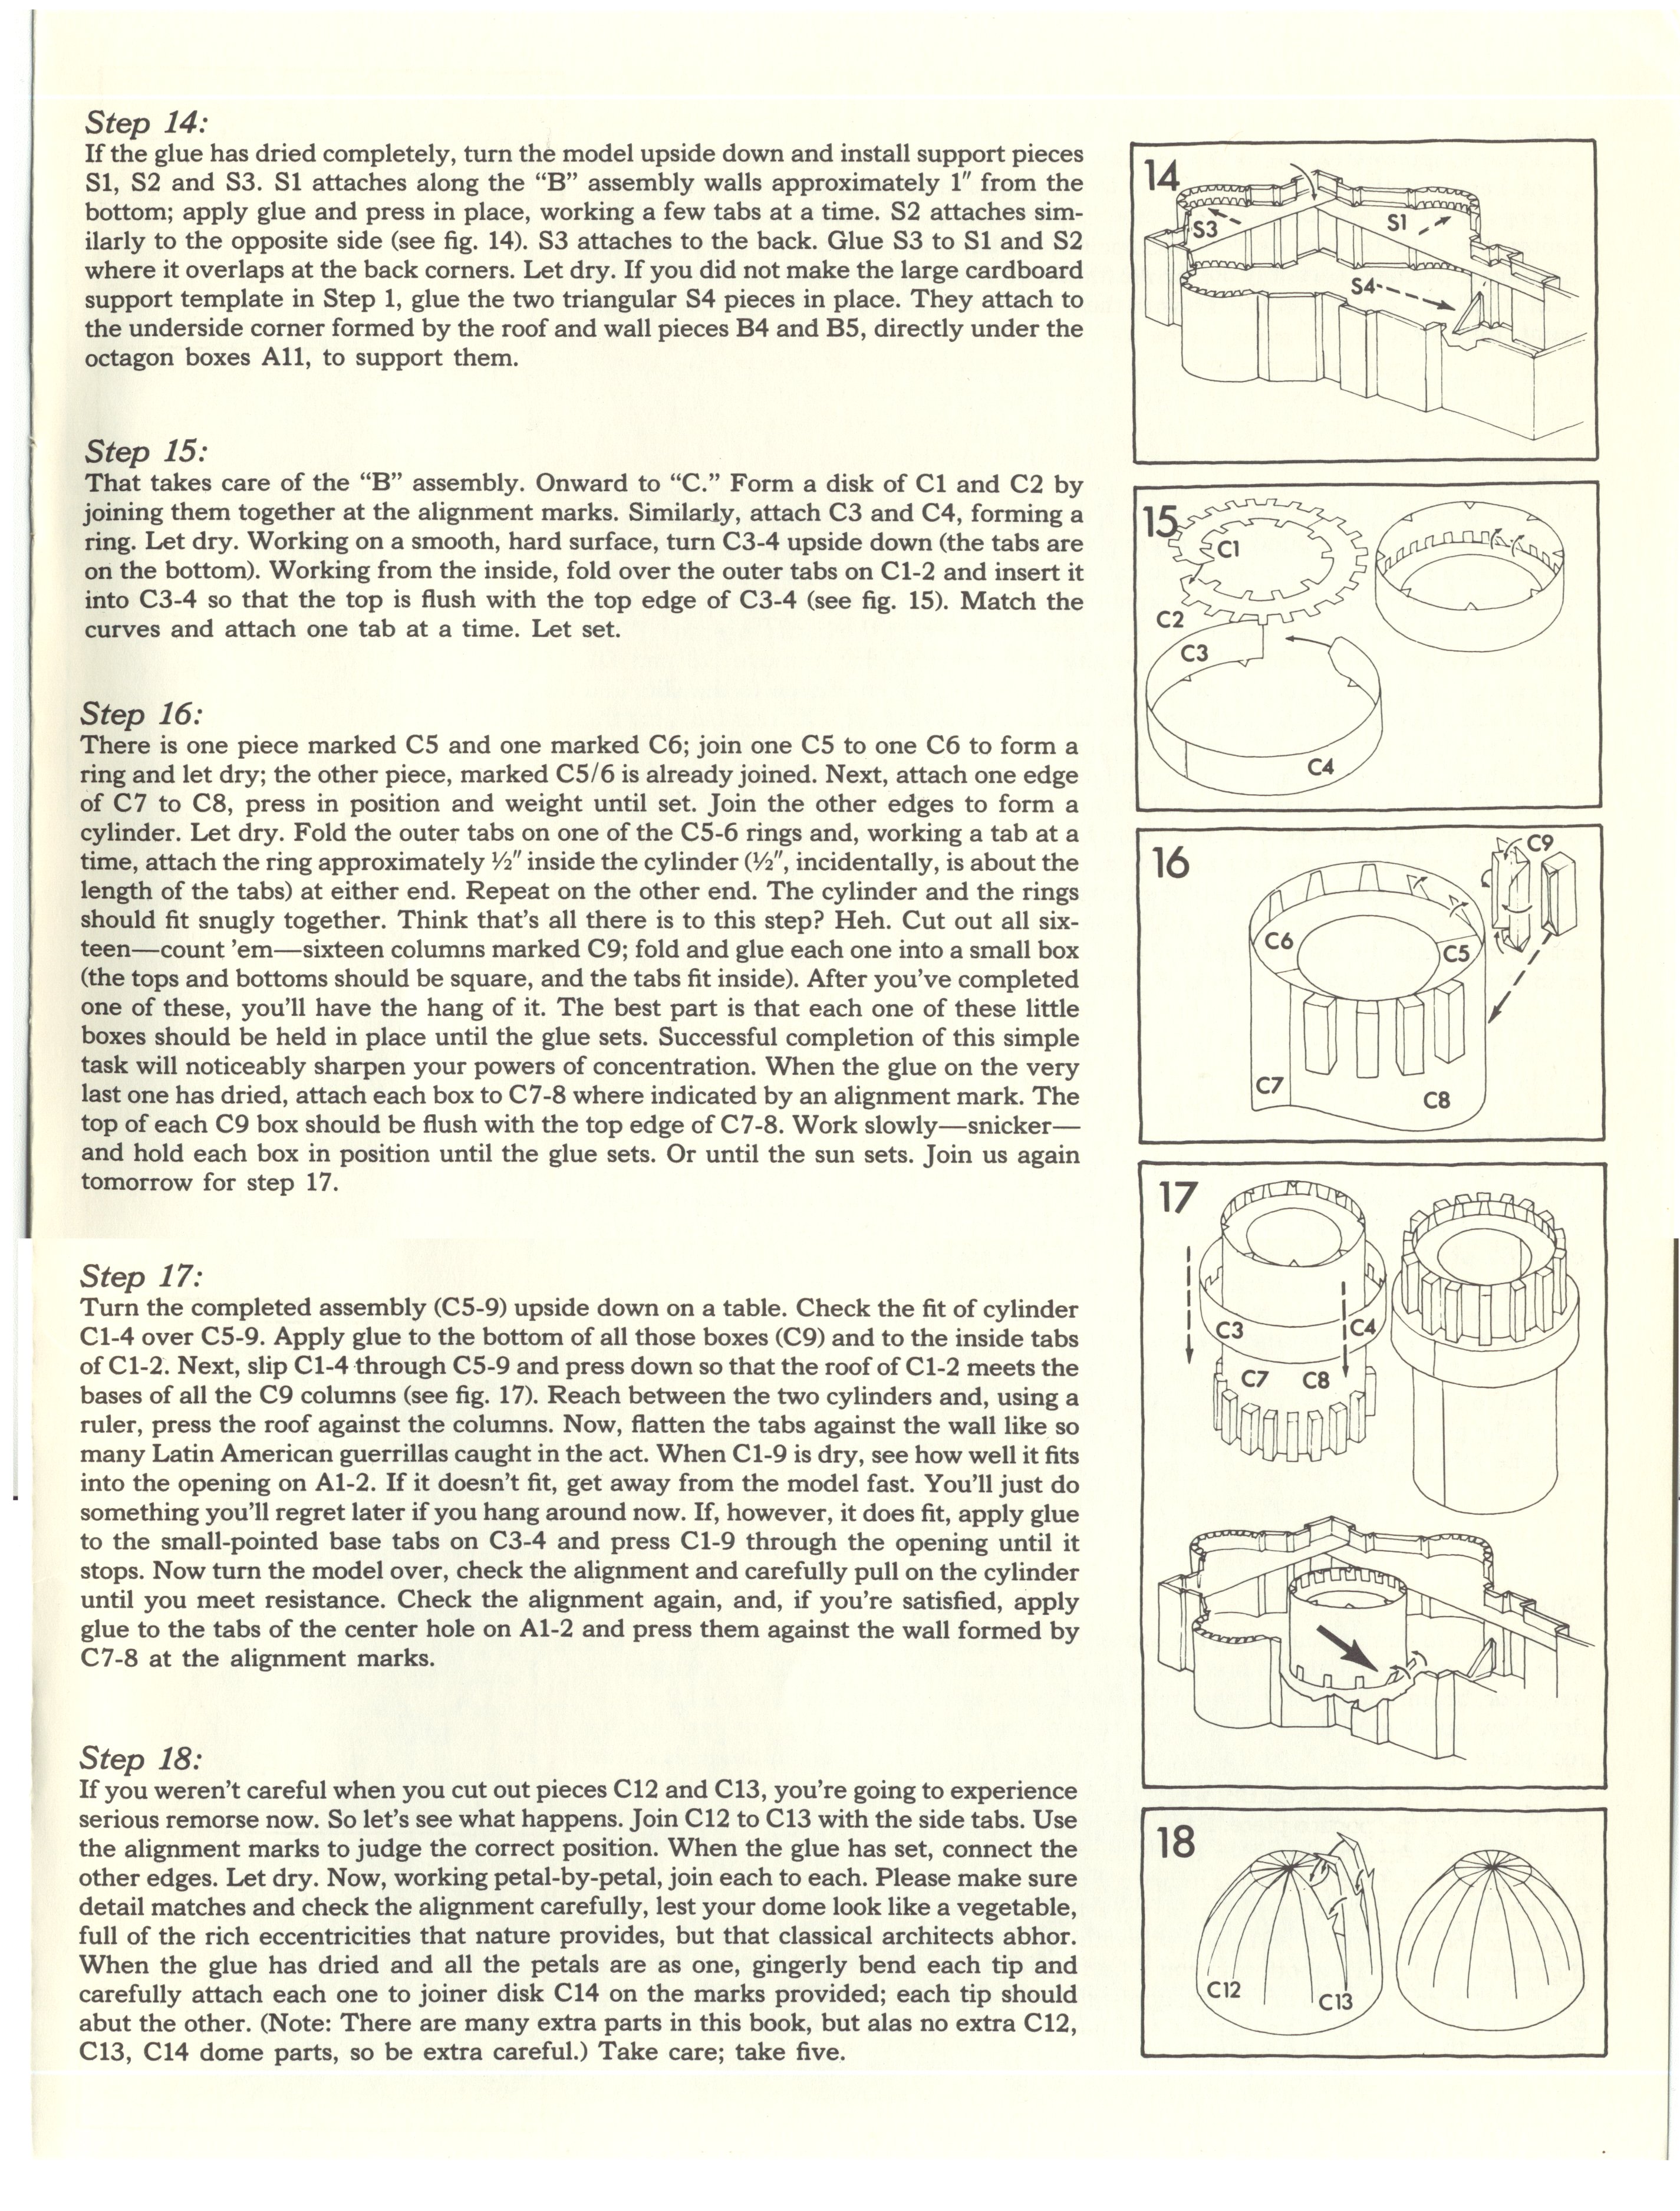
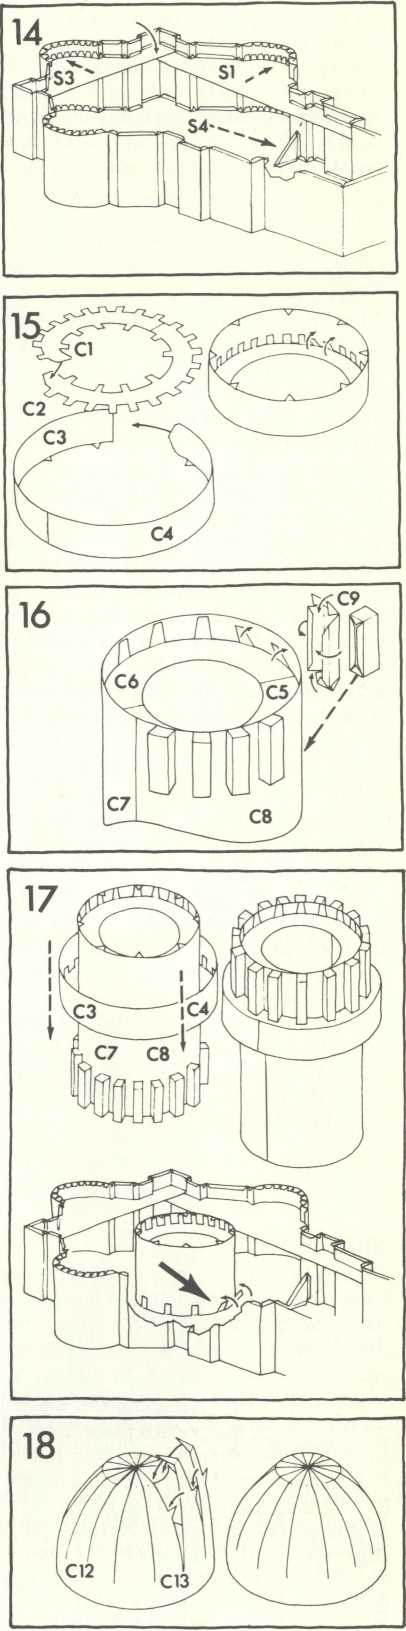
Step 14:
If the glue has dried completely, turn the model upside down and install support pieces SI, S2 and S3. SI attaches along the “B” assembly walls approximately 1" from the bottom; apply glue and press in place, working a few tabs at a time. S2 attaches sim-ilarly to the opposite side (see fig. 14). S3 attaches to the back. Glue S3 to SI and S2 where it overlaps at the back corners. Let dry. If you did not make the large cardboard support template in Step 1, glue the two triangular S4 pieces in place. They attach to the underside corner formed by the roof and wali pieces B4 and B5, directly under the octagon boxes Ali, to support them.
Step 15:
That takes care of the “B” assembly. Onward to “C.” Form a disk of Cl and C2 by joining them together at the alignment marks. Similarly, attach C3 and C4, forming a ring. Let dry. Working on a smooth, hard surface, turn C3-4 upside down (the tabs are on the bottom). Working from the inside, fold over the outer tabs on Cl-2 and insert it into C3-4 so that the top is flush with the top edge of C3-4 (see fig. 15). Match the curves and attach one tab at a time. Let set.
Step 16:
There is one piece marked C5 and one marked C6; join one C5 to one C6 to form a ring and let dry; the other piece, marked C5/6 is already joined. Next, attach one edge of C7 to C8, press in position and weight until set. Join the other edges to form a cylinder. Let dry. Fold the outer tabs on one of the C5-6 rings and, working a tab at a time, attach the ring approximately W' inside the cylinder W, incidentally, is about the length of the tabs) at either end. Repeat on the other end. The cylinder and the rings should fit snugly together. Think that’s all there is to this step? Heh. Cut out all six-teen—count ’em—sixteen columns marked C9; fold and glue each one into a smali box (the tops and bottoms should be sąuare, and the tabs fit inside). After you’ve completed one of these, you’ll have the hang of it. The best part is that each one of these little boxes should be held in place until the glue sets. Successful completion of this simple task will noticeably sharpen your powers of concentration. When the glue on the very last one has dried, attach each box to C7-8 where indicated by an alignment mark. The top of each C9 box should be flush with the top edge of C7-8. Work slowly—snicker— and hołd each box in position until the glue sets. Or until the sun sets. Join us again tomorrow for step 17.
Step 17:
Tum the completed assembly (C5-9) upside down on a table. Check the fit of cylinder Cl-4 over C5-9. Apply glue to the bottom of all those boxes (C9) and to the inside tabs of Cl-2. Next, slip Cl-4 through C5-9 and press down so that the roof of Cl-2 meets the bases of all the C9 columns (see fig. 17). Reach between the two cylinders and, using a ruler, press the roof against the columns. Now, flatten the tabs against the wali like so many Latin American guerrillas caught in the act. When Cl-9 is dry, see how well it fits into the opening on Al-2. If it doesn’t fit, get away from the model fast. You’ll just do something you’ll regret later if you hang around now. If, however, it does fit, apply glue to the small-pointed base tabs on C3-4 and press Cl-9 through the opening until it stops. Now turn the model over, check the alignment and carefully puli on the cylinder until you meet resistance. Check the alignment again, and, if you’re satisfied, apply glue to the tabs of the center hole on Al-2 and press them against the wali formed by C7-8 at the alignment marks.
Step 18:
If you weren’t careful when you cut out pieces C12 and C13, you’re going to experience serious remorse now. So let’s see what happens. Join C12 to C13 with the side tabs. Use the alignment marks to judge the correct position. When the glue has set, connect the other edges. Let dry. Now, working petal-by-petal, join each to each. Please make surę detail matches and check the alignment carefully, lest your dome look like a vegetable, fuli of the rich eccentricities that naturę provides, but that classical architects abhor. When the glue has dried and all the petals are as one, gingerly bend each tip and carefully attach each one to joiner disk C14 on the marks provided; each tip should abut the other. (Notę: There are many extra parts in this book, but alas no extra C12, C13, C14 dome parts, so be extra careful.) Take care; take five.
Wyszukiwarka
Podobne podstrony:
53874 Instr 7 Step 19: St. Peter’s, apparently, has morę rings than Wagner ever dreamed of, and to p
81696 Instr 5 Step 9: Fold over the railings on pieces B2 and B3; place therii under a weight until
mb 31 MUSCLE BUILDING. 31 was being madę by the model. Illustrations Nos. 5 and 7 show the triceps o
let s cut paper32 Turn Your Frown Upside Down To poronts S l«-n your chikl has succossfully stoi^-d
dinocards50 Dinosaur /Memory ęame Gards Cut out the cards, To play: turn a II the cards upside doum
00112 ^3e1d5508e9adece8aaadfb64a9c05a 112 McWilliams 14] sjxy(x)-r(x)s>(x) Since this ratio equa
2) MSC/YLR (SERYICE AREA) If the system has morę than one MSC,the PLMN is subdivided into several MS
Instr 4 Step 6: Examine piece A13 carefully. Enigmatic, no? Now examine the assembly illustration (f
mbs 073 MY BREATHING SYSTEM Even if the heart has been weakened by athletics badly per-formed, it is
10 (244) *tz i fte Audto-Lingual Method the other students before him. If the student has difficulty
więcej podobnych podstron