jsc0920016
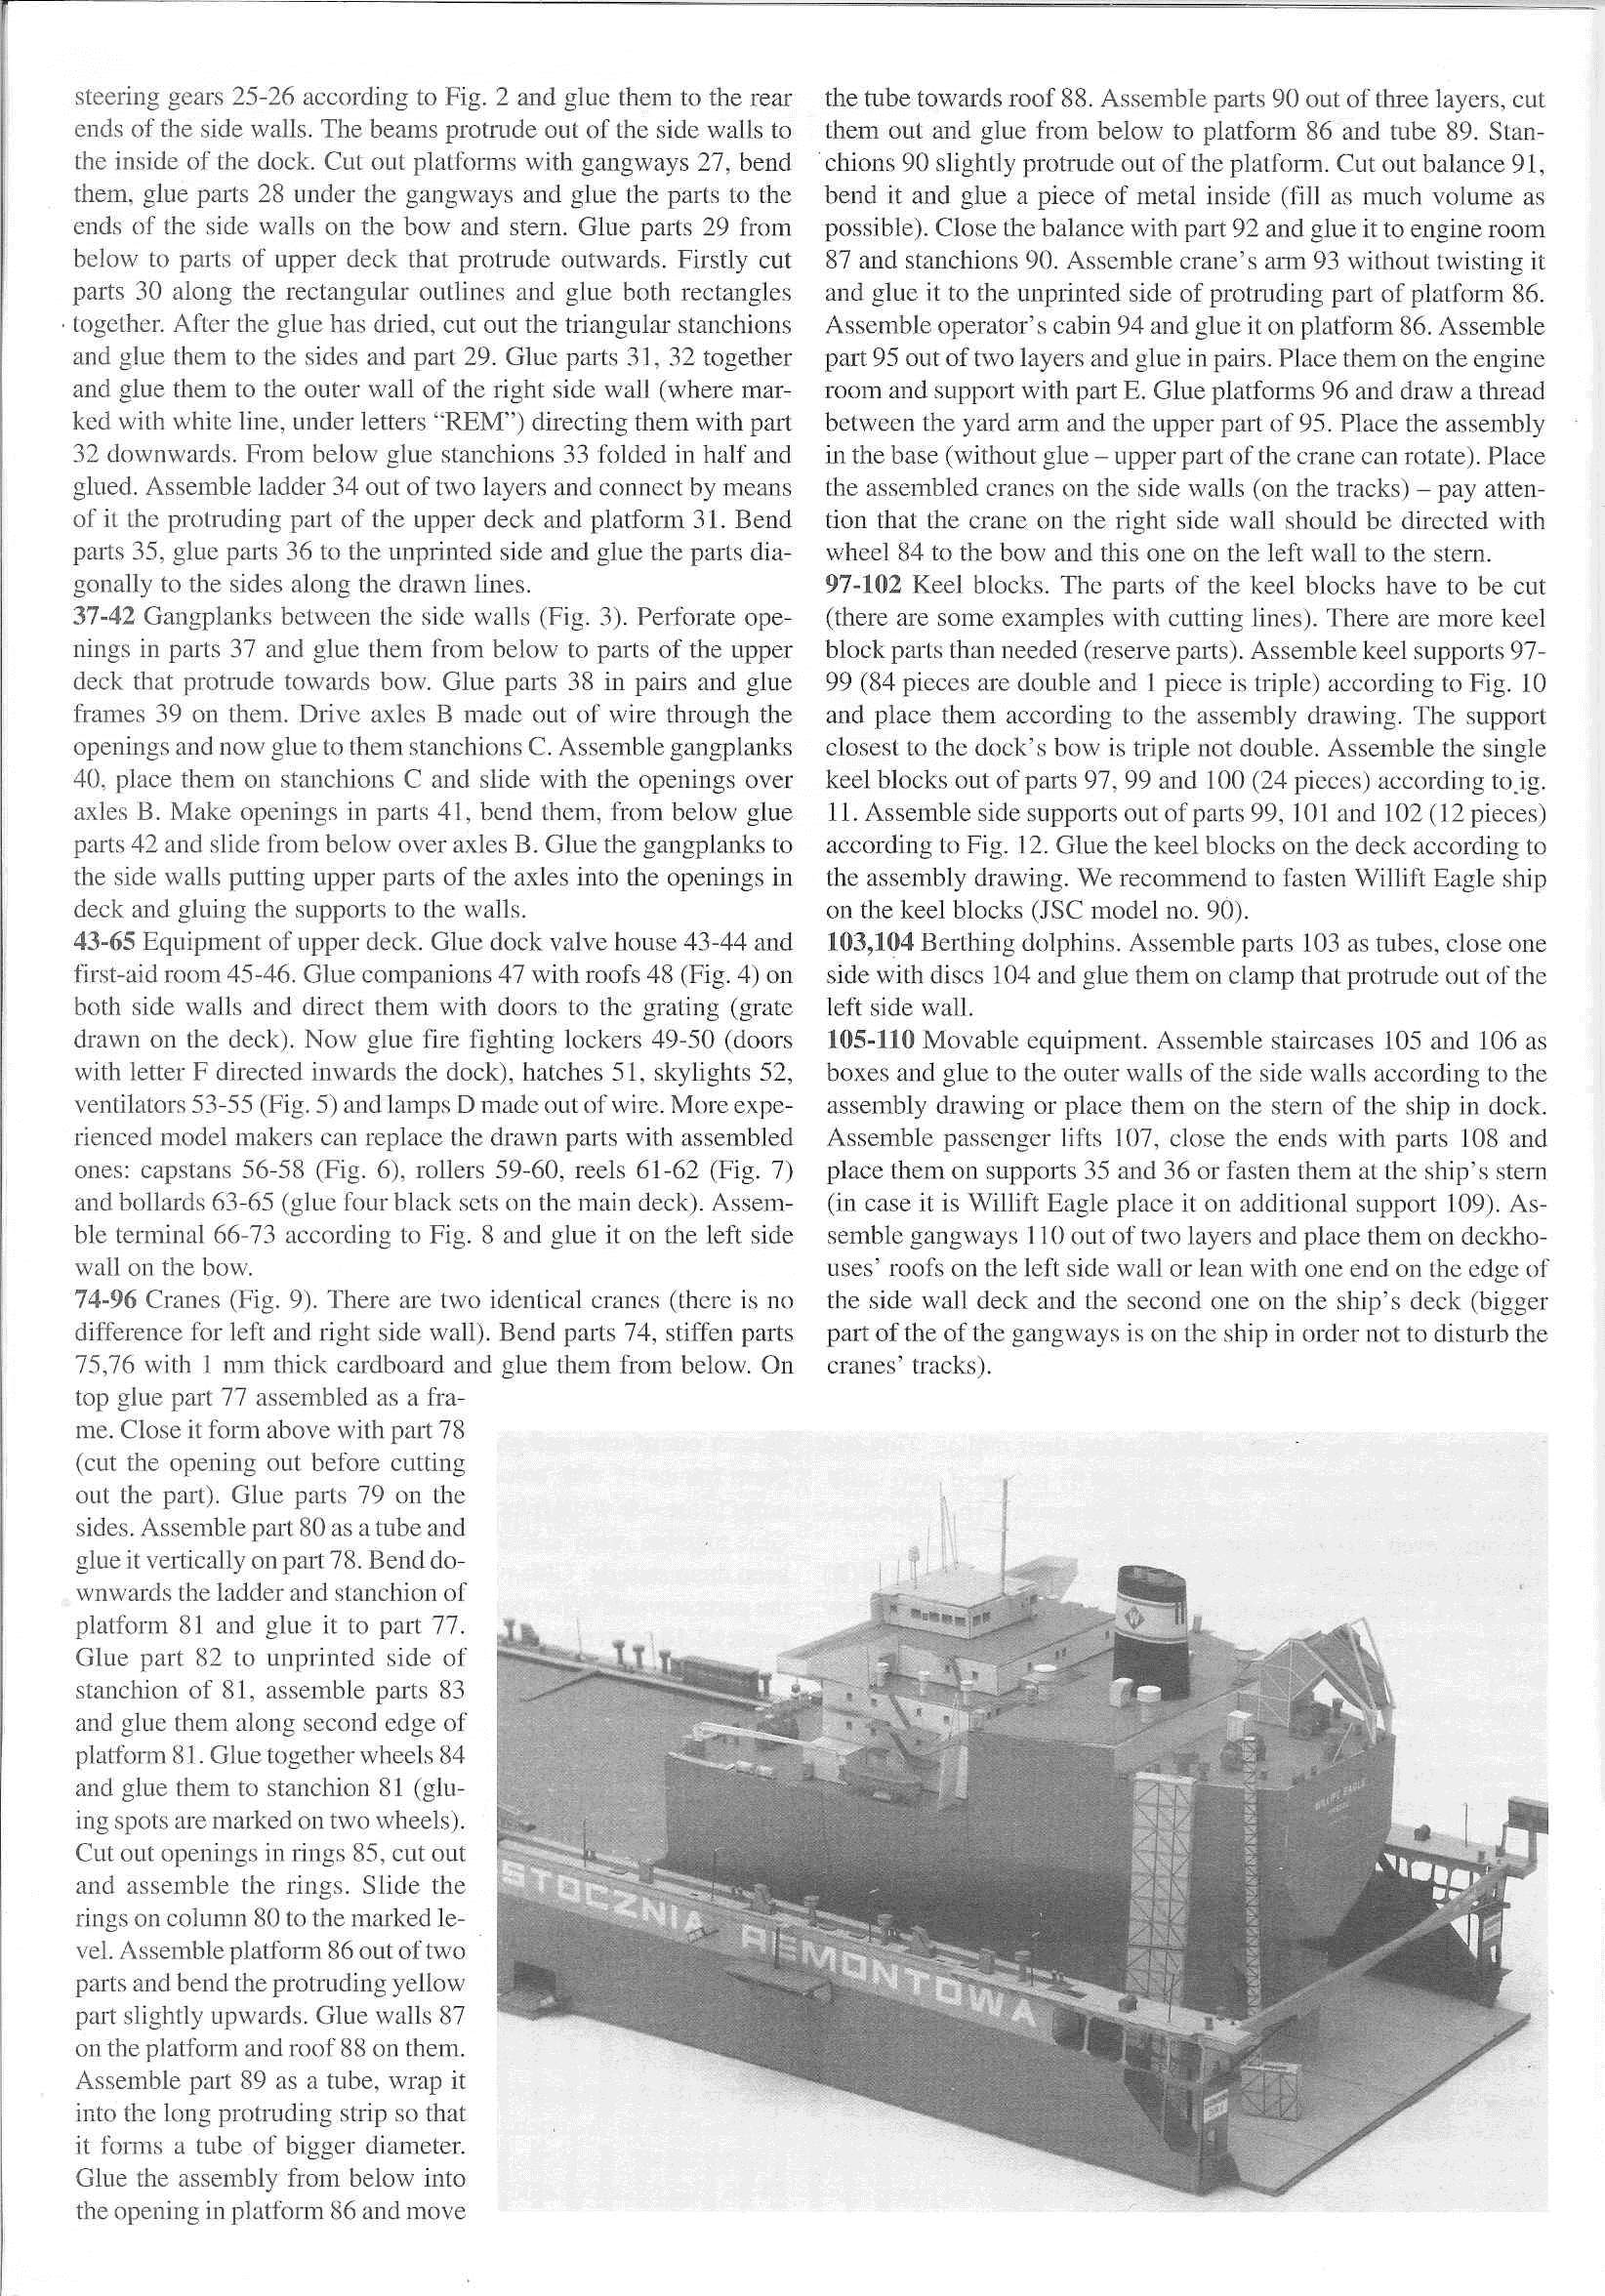
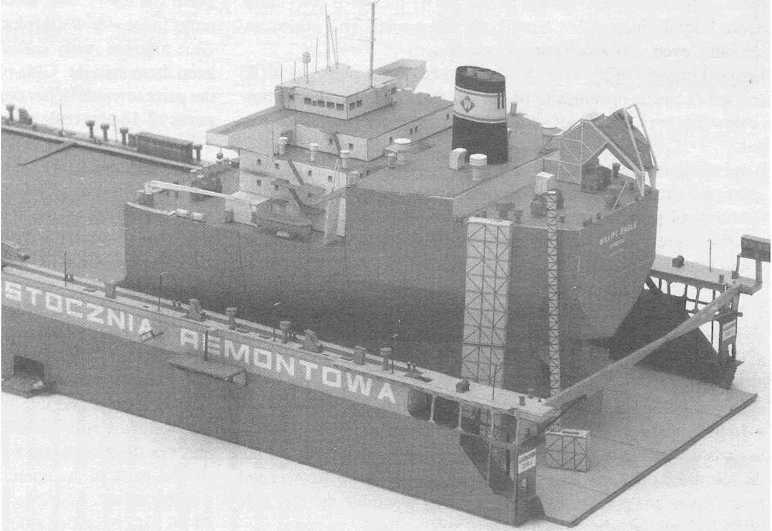
steering gears 25-26 according to Fig. 2 and glue them to the rear ends of the side walls. The beams protrude out of the side walls to the inside of the dock. Cut out platforms with gangways 27, bend them, glue parts 28 under the gangways and glue the parts to the ends of the side walls on the bow and stem. Glue parts 29 from below to parts of upper deck that protrude outwards. Firstly cut parts 30 along the rectangular outlines and glue both reetangles together. After the glue has dried, cut out the triangular stanchions and glue them to the sides and part 29. Glue parts 31, 32 together and glue them to the outer wali of the right side wali (where mar-ked with white linę, under letters ''REM”) directing them with part 32 downwards. From below glue stanchions 33 foldcd in half and glued. Assemble ladder 34 out of two layers and connect by means of it the prolruding part of the upper deck and platform 31. Bend parts 35, glue parts 36 to the unprinted side and glue the parts dia-gonally to the sides along the drawn lines.
37-42 Gangplanks between the side walls (Fig. 3). Perforate ope-nings in parts 37 and glue them from below to parts of the upper deck that protrude towards bow. Glue parts 38 in pairs and glue frames 39 on them. Drive axles B madę out of wire through the openings and now glue to them stanchions C. Assemble gangplanks 40, place them on stanchions C and slide with the openings over axles B. Make openings in parts 41, bend them, from below glue parts 42 and slide from below over axles B. Glue the gangplanks to the side walls putting upper parts of the axles into the openings in deck and gluing the supports to the walls.
43-65 Eąuipment of upper deck. Glue dock valve house 43-44 and first-aid room 45-46. Glue companions 47 with roofs 48 (Fig. 4) on both side walls and direct them with doors to the grating (grate drawn on the deck). Now glue fire fighting lockers 49-50 (doors with letter F directed inwards the dock), hatches 51, skylights 52, ventilators 53-55 (Fig. 5) and lamps D madę out of wire. Morę expe-rienced model makers can replace the drawn parts with assembled ones: capstans 56-58 (Fig. 6), rollers 59-60, reels 61-62 (Fig. 7) and bollards 63-65 (glue four black sets on the main deck). Assemble terminal 66-73 according to Fig. 8 and glue it on the left side wali on the bow.
74-96 Cranes (Fig. 9). There are two identical crancs (therc is no difference for left and right side wali). Bend parts 74, stiffen parts 75,76 with 1 mm thick cardboard and glue them from below. On top glue part 77 assembled as a ffa-me. Close it form above with part 78 (cut the opening out before cutting out the part). Glue parts 79 on the sides. Assemble part 80 as a tubę and glue it vertically on part 78. Bend downwards the ladder and stanchion of platform 81 and glue it to part 77.
Glue part 82 to unprinted side of stanchion of 81, assemble parts 83 and glue them along second edge of platform 81. Glue together wheels 84 and glue them to stanchion 81 (gluing spots are marked on two wheels).
Cut out openings in rings 85, cut out and assemble the rings. Slide the rings on column 80 to the marked le-vel. Assemble platform 86 out of two parts and bend the protruding yellow part slightly upwards. Glue walls 87 on the platform and roof 88 on them.
Assemble part 89 as a tubę, wrap it into the long protruding strip so that it forms a tubę of bigger diameter.
Glue the assembly from below into the opening in platform 86 and move the tubę towards roof 88. Assemble parts 90 out of three layers, cut them out and glue from below to platform 86 and tubę 89. Stanchions 90 slightly protrude out of the platform. Cut out balance 91, bend it and glue a piece of metal inside (fili as much volume as possible). Close the balance with part 92 and glue it to engine room 87 and stanchions 90. Assemble crane’s arm 93 without twisting it and glue it to the unprinted side of protruding part of platform 86. Assemble operator’s cabin 94 and glue it on platform 86. Assemble part 95 out of two layers and glue in pairs. Place them on the engine room and support with part E. Glue platforms 96 and draw a thread between the yard arm and the upper part of 95. Place the assembly in the base (without glue - upper part of the crane can rotate). Place the assembled cranes on the side walls (on the tracks) - pay atten-tion that the crane on the right side wali should be directed with wheel 84 to the bow and this one on the left wali to the stern. 97-102 Keel blocks. The parts of the keel blocks have to be cut (there are some examples with cutting lines). There are morę keel błock parts than needed (reserve parts). Assemble keel supports 97-99 (84 pieces are double and 1 piece is triple) according to Fig. 10 and place them according to the assembly drawing. The support closest to the dock’s bow is triple not double. Assemble the single keel blocks out of parts 97, 99 and 100 (24 pieces) according to.ig. 11. Assemble side supports out of parts 99, 101 and 102 (12 pieces) according to Fig. 12. Glue the keel blocks on the deck according to the assembly drawing. We recommend to fasten Willift Eagle ship on the keel blocks (JSC model no. 9Ó).
103,104 Berthing dolphins. Assemble parts 103 as tubes, close one side with dises 104 and glue them on clamp that protrude out of the left side wali.
105-110 Movable equipment. Assemble staircases 105 and 106 as boxes and glue to the outer walls of the side walls according to the assembly drawing or place them on the stern of the ship in dock. Assemble passenger lifts 107, close the ends with parts 108 and place them on supports 35 and 36 or fasten them at the ship’s stem (in case it is Willift Eagle place it on additional support 109). Assemble gangways 110 out of two layers and place them on deckho-uses’ roofs on the left side wali or lean with one end on the edge of the side wali deck and the second one on the ship’s deck (bigger part of the of the gangways is on the ship in order not to disturb the cranes’ tracks).
Wyszukiwarka
Podobne podstrony:
jsc0920016 steering gears 25-26 according to Fig. 2 and glue them to the rear ends of the side walls
125 Sweden Fig. 14 Draughtlng of static sounding results according to the SGF standard. Recently, Ni
26 (34) The Eighteenth Dery ofDecember 2 shuttles. The snowflake is madę in split rings according to
fonetyka0001 fe mm INTONATION PRAGTICE TUTORIAL FOCUS / TONICITY Read thefollowing sentences accordi
00227 fa893f5d70e2a8634abfc718a817fdc 229Applications of the EWMA is scaled according to the percen
IMG@66 Edukacja ma znaczenie According to an OECD analysis of ESS data, each extra year of education
172 Aneta Wszelaki DIFFERENCES IN THE PREPARATION OF THE FINANCIAL STATEMENTS OF THE BANK ACCORDING
18 Małgorzata Bednarczyk, Ewa Wszendybył-Skulska According to the model presented in Figurę 2, the e
20 Paweł Antonowicz the effective CRM system must play various different functions. According to the
MODERNIZATION AND EXTENSION OF THE DAIRY FARM ACCORDING TO THE EUROPEAN STANDARDS Project initiato
RECONSTRACTION OF THE PIG COMPLEX ACCORDING TO THE EUROPEAN STANDARDS Project initiator Privately
Department and Clinic of Surgery Decreasing the number of Department was inforced according to the s
scratches and fingerprints on the disc surface. Over and above that, according to the specifications
Comparison of Liąuid Propellant Rocket Engine Feed Systems - 1 - 11 According to the previously expo
cw0028 UNIT 1Brands INDIVIDUAL SOUNDSEl Put the words from the box into the correct column, accordin
fonetyka0001 fe mm INTONATION PRAGTICE TUTORIAL FOCUS / TONICITY Read thefollowing sentences accordi
więcej podobnych podstron