p004 (2)

10
170
★ For best results use 80 gr/m2 special coated paper If you have ink jet printer
★Printthe layout with maximal available resolution
MIII II
Page 5 of 4
170-
160-
150-
90
60
50
40
30
Studythedrawings of assembly steps carefully beforestartingtheworkon the model. Make surę you understand the purpose and place of every part.
The assembly requires some basie tools, such as scissors, Sharp modeling knife, blunt knife for scoring the fold lines, ruler and needle. Additional materials you need are one pin to make the airscrew shaft and one piece of cardboard approx. 0.3 mm thickfor reinforcing elements and wheels. You'll need of course suitable cement too. For cement application you can use toothpicksorsome similartool (special fine cement applicator is mostsuitable if you have one).
Start with the central fuselage segment 1. Do not forget to out the holes on it where the wing longerone 7 will be placed. Glue the connecting stripes 1a to the backside of the segment and glue it in cylindrical form. Place formers 1b and 1c in its edges, keeping coincidence of the lines of sym metry.
Continue with the segment 2. Carefully form its exhaust sockets, giving them concavity, following the shape of the former 2a. Then glue it to 1.
Assembly the taił segment 3, assuring smooth transition of its oval shape in the front edge to fiat vertical shape of the rear. Glue 4 to 1. Form and assembly the cockpit 5 - 5d and position it on the fuselage. Add the vertical stabilizer 6, 6a, keeping the symmetry of the model.
Prepare wing's longerone 7 - 7b and insert it in the holes of 1. Glue it to 1 and then place two wing profiles 7c,d on it. Assembly the wing halves 8 and 9 and glue them to fuselage, inserting the longerone 7 in them in a way that the profiles stay in their bases. Glue the wing-fuselage joints 10 and 11, applying the glue on their joint places on 1,3, 8 and 9. Cut and assembly horizontal stabilizer 12 and 13 and glue itto 3.
Continue with the engine cowling 14 -17. Be extremely caeful during gluing the formers 14 c and 14 d. the last one must be positioned 3 mm inside 14. Control the joint of the segment 14 to the front of the fuselage until drying the glue.
Assembly the propeller bearing 18 and propeller hub 19 - 21, using a pin as a propeller shaft. Add the propeller blades 22, 22a and insert the shaft in 18, gluing 1d on the backside of the shaft, ensuring free rotation of the propeller. Glue the engine assembly to 2b and add
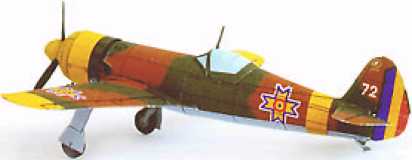
Industris Aeronautika Romania IAR-80
exhausting pipes 23
Assembly the lending gear 24 - 28. Cut the wheels parts 26 from thick card, glue them together, round their edges with sandpaper and paint them in black.
Complete the model adding remaining smali details - carburetor intake 30, antenna mast, taił support, Pitot tubę and armament.
If you prefer flying model, assemble it with retracted undercarriage and abandon propeller blades. Add some weight in the nose for appropriate model’s balancing - its center of gravity must be on approximately 25% of the average wing chord.
Nowyourmodel is ready. Enjoy your IAR80.
Industris Aeronautika Romania IAR-80
★ For individual use only, under no circumstances can this document be resold without written permission by ModelArt.
★ You can contact us sending E-mail to: modelart(a>tusk.icn.bg
140-
130-
120-
100-
90-
60-
50-
40-
30-
20-
10 20 30 40 50 60 70 90 100 110 120 130 140 1 50 160 170 180 190 200 210 220 230 240
20
Wyszukiwarka
Podobne podstrony:
p001 10 20 MIII II 170 ★ For best results use 80 gr/m2 special coated paper If you
p005 t=rn I llllll ★ For best results use 80 gr/m2 special coated paper If you have ink jet printer
p002 (2) MMII ★ For best results use 80 gr/m2 special coated paper If you have ink
26 (707) fore/f /Ame ca/r/Materials Blank greetings card 3mm (Vsin) ąuilling paper. If you have some
essent?rving?45 First Cuts: Chip C a r v i n g about 250 x 200 x 25mm (10 x 8 x lin) for a decorativ
christmas memory page 2 Print 2 copies. For best results print on cardstock paper. Print background
11 5 If you have mastered tlie control over your voice and emotions, get ready for speaking during n
więcej podobnych podstron